DIY Disney Hats Inspired by Lilo & Stitch
Hats are a fun and inexpensive way to create a costume or even for a Disney Bounding day. It doesn't matter what age you are everyone can wear a hat! These two hats inspired from the popular Disney movie Lilo & Stitch. They are a fairly simple DIY project even a novice crafter like myself can do.
Stitch (from Lilo & Stitch) and Angel (Stitch girlfriend) DIY Hats
Supplies Needed
* Hat (Blue: Stitch, Pink: Angel)
* Felt Sheets (1 sheet of each: black, white then: Blue, pink & light blue: Stitch; Pink, cream & lavender: Angel)
* Hot Glue Gun & glue
* Scissors
* Sewing Machine or thread with needle
Preparation
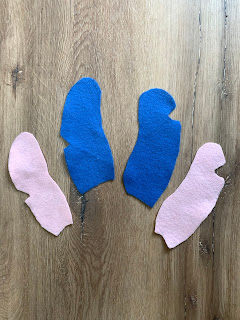
To create the ears I used the insert that came with my hats, it made the perfect template, measuring about 7 inches long.
For Stitch's ears I free handed the little slits he has one in each ear.
Angel does not have any slits in her ears.
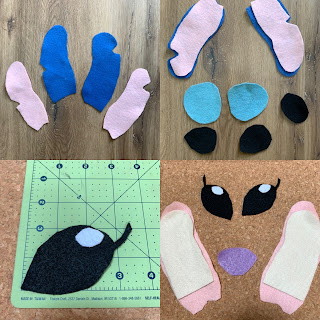
The inner part of the ears I took the same ear and just cut it to size until it was a tad smaller than the outer ear.
For the eyes, I looked at photos on the internet and just free handed before cutting out on the black felt. Angel's eyes are more almond shape and Stitch's are more Oval like in shape. Both characters have a tiny white circle on each eye too.
Behind Stitch's eyeballs I used the lighter blue and cut out circular like shape much larger than the black part of his eyes.
For the noses both are similar in shape and size, I used black for Stitch and lavender for Angel.
Assembly
Now that all the pieces are cut out you can start to assemble. Plus in your hot glue gun and let it warm up. Before I start to hot glue I like to lay out all my pieces on the hats so I have an idea of where I want everything to go.
I first assembled each characters ears gluing the inner part to the outer part, making sure you could still see the outer part edges.
Hot glue on the little white dots to upper part of each eye (pay attention to the orientation of how you will place the eyes).
Stitch
Hot glue the light blue circles on front of the hat, next to each other.
Hot glue the black part onto the lower section of the light blue part on the hat.
Hot glue the black nose onto the brim of the hat, centered with the eyes.
Angel
Hot glue the black part onto the lower section of the front of the hat.
Cut two littles thin strips of black to make eyelashes and hot glue then on the side of each eye.
Hot glue the lavender nose onto the brim of the hat, centered with the eyes.
Final Step (the Ears)
Decide on the placement of the ears. At the bottom slightly fold the ear inward so that you can see the outer part of the ear, but still see the inside too. Take the bottom of the ear (the folded part) and sew it or hand stitch it the the inside flap of the hat. Repeat the step for the other ear.
Last step: if you want perky ears Pull the ear upwards and slightly sew the felt an inch or two to the side of the hat. Repeat the step for the other ear. This will help the ears not be floppy and stay better attached to the sides of the hat.
What did you think? I think they both turned out adorable and I can't wait to wear them on my next vacation. Which one was your favorite Stitch or Angel?


